Cold Brew Coffee
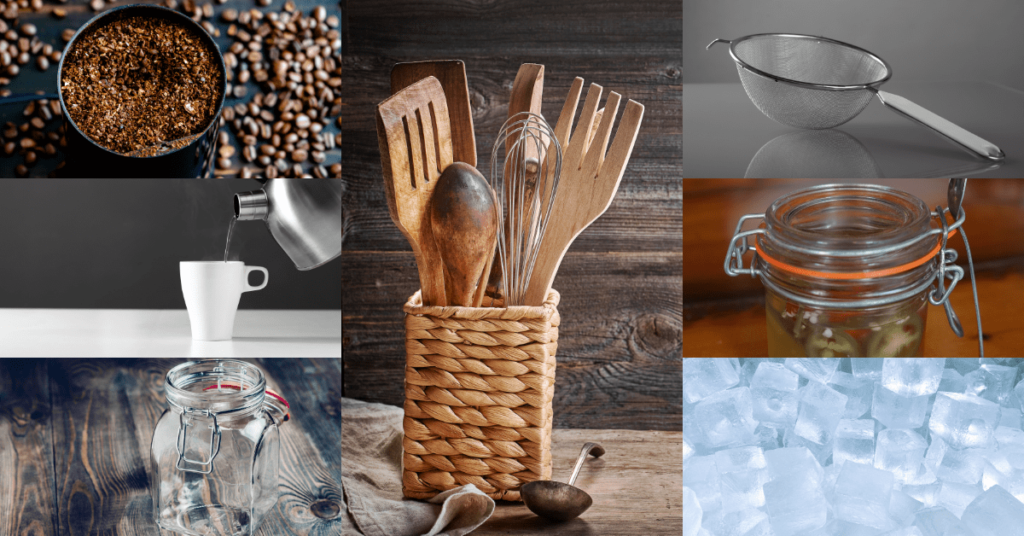
Equipment
- 1 Large jar or pitcher with lid
- 1 Stirring utensil
- 1 Fine mesh strainer or cheesecloth
- 1 Sealable container or bottle
Ingredients
- 1 cup coarsely ground coffee beans
- 4 cups filtered water
Instructions
Prepare Coffee Grounds
- Measure 1 cup of coarsely ground coffee beans.
Combine Coffee and Water
- In a large jar or pitcher, add the coarsely ground coffee beans. Pour 4 cups of filtered water over the coffee grounds.
Stir Gently
- Use a long spoon or stirring utensil to gently stir the coffee grounds and water, ensuring even saturation.
Seal and Steep
- Seal the jar or pitcher with the lid and let it steep at room temperature or in the refrigerator for 12 to 24 hours, depending on your preferred strength.
Strain the Cold Brew
- After the steeping period, use a fine mesh strainer or cheesecloth to separate the coffee liquid from the grounds. Strain the cold brew into another container.
Transfer to Sealable Container
- Transfer the strained cold brew liquid to a sealable container or bottle for convenient storage.
Serve and Enjoy
- To serve, pour the cold brew over ice if desired. Customize with water, milk, or sweeteners based on your preference.
Store Remaining Cold Brew
- Seal the container and store any remaining cold brew in the refrigerator for up to two weeks.
Notes
- Experiment with the water-to-coffee ratio to adjust the strength of your cold brew.
- Customize your serving with ice, milk, or sweeteners to suit your taste preferences.
- Cold brew concentrate can be diluted with water or milk when serving for a milder taste.
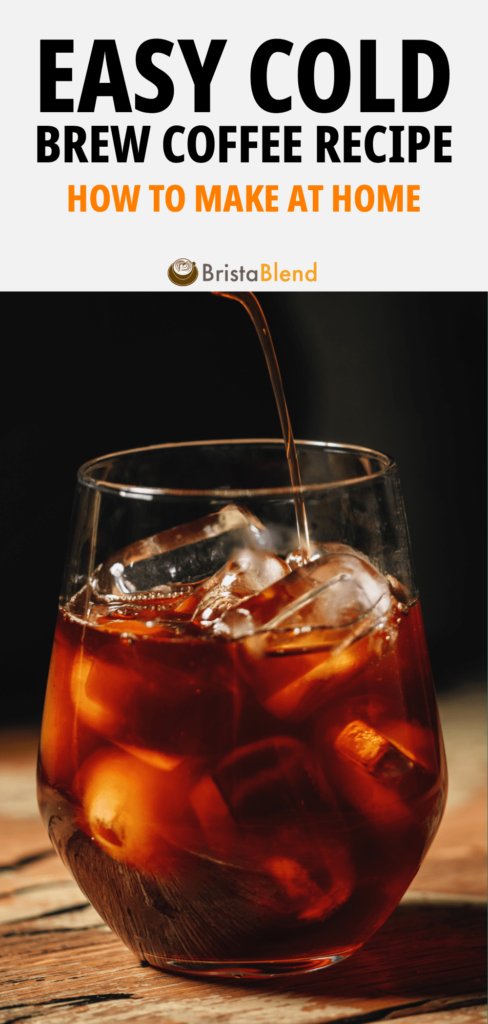
Cold brew coffee has become a popular and refreshing alternative to traditional hot coffee, especially during warm weather. Known for its smooth and less acidic flavor profile, cold brew is a favorite among coffee enthusiasts. In this guide, we’ll explore the art of making cold brew coffee at home, uncovering the secrets to a delicious and satisfying brew.
Whether you’re a seasoned coffee connoisseur or a casual coffee drinker, creating your own cold brew is a simple and rewarding process that allows you to tailor the taste to your preferences. Let’s dive into the world of cold brew coffee and discover how you can enjoy this chilled, caffeinated delight from the comfort of your home.
Equipment and Ingredients Needed
To embark on your cold brew coffee-making journey, you’ll need a few essential tools and quality ingredients. Gathering the right equipment ensures a smooth brewing process and a delightful end result.
Here’s a breakdown of what you’ll need:
- Coarsely Ground Coffee Beans:
- Select high-quality coffee beans and grind them to a coarse consistency. This helps extract the flavors without the bitterness.
- Filtered Water:
- Opt for clean, filtered water to enhance the purity of your cold brew. The water-to-coffee ratio plays a crucial role in achieving the desired strength.
- Large Jar or Pitcher:
- Choose a vessel with enough capacity to hold both the coffee grounds and water. A jar or pitcher with a lid is ideal for steeping and storage.
- Stirring Utensil:
- Have a long spoon or stirring stick on hand to ensure even saturation of coffee grounds in water.
- Fine Mesh Strainer or Cheesecloth:
- For effective filtration, use a fine mesh strainer or cheesecloth to separate the brewed coffee from the grounds.
- Secondary Filtration (Optional):
- If you desire an even smoother texture, consider using a paper coffee filter or a specialized cold brew coffee filter.
- Sealable Container or Bottle:
- After straining, transfer the cold brew to a sealable container or bottle for storage in the refrigerator.
- Ice Cubes (Optional):
- To serve your cold brew over ice and enhance the chilling effect, keep some ice cubes ready.
By having these essential items on hand, you’ll be well-prepared to create your own refreshing cold brew coffee at home. Now, let’s move on to the next steps in perfecting your cold brew experience.
Choosing the Right Coffee Beans
Selecting the right coffee beans is a crucial step in ensuring a flavorful and well-balanced cold brew. The choice of beans significantly influences the taste, aroma, and overall experience of your coffee.
Here’s a guide to help you make the best selection:
- Opt for High-Quality Whole Beans:
- Start with whole coffee beans of high quality. Look for fresh beans with a roasted-on date to ensure optimal flavor.
- Choose a Medium to Dark Roast:
- While personal preference plays a role, medium to dark roast beans are commonly preferred for cold brew. These roasts bring out rich and bold flavors.
- Single-Origin or Blend:
- Consider whether you prefer single-origin beans, which showcase the unique characteristics of a specific region, or a blend for a more complex flavor profile.
- Flavor Profile:
- Identify the flavor notes you enjoy in coffee. Whether it’s a chocolatey, nutty, fruity, or floral profile, choose beans that align with your taste preferences.
- Grind Size Matters:
- Since cold brew requires a coarser grind, choose beans that can be ground to this consistency. This coarse grind prevents over-extraction and bitterness.
- Experiment with Coffee Varieties:
- Don’t hesitate to experiment with different coffee varieties and origins to find the one that suits your palate best.
- Consider Sustainable and Ethical Sourcing:
- If you’re conscious of ethical and environmental factors, opt for beans from reputable sources that prioritize fair trade and sustainability.
- Freshness is Key:
- Ensure the beans are fresh. Avoid pre-ground coffee, as the flavors tend to degrade faster. Grind your beans just before brewing for the best results.
By paying attention to these factors, you’ll be well on your way to choosing the perfect coffee beans for your homemade cold brew. Experimenting with different beans allows you to tailor your cold brew experience to your unique taste preferences.
Grinding Coffee Beans for Cold Brew
The coarseness of your coffee grind is a critical factor in achieving a smooth and flavorful cold brew. Grinding coffee beans for cold brew requires a specific consistency to extract the desired flavors without over-extraction.
Follow these guidelines for optimal results:
- Use a Burr Grinder:
- Invest in a burr grinder rather than a blade grinder. Burr grinders provide a more consistent grind size, essential for cold brew.
- Select a Coarse Grind:
- Adjust your grinder settings to achieve a coarse grind. The coarseness helps prevent over-extraction, resulting in a less bitter and smoother cold brew.
- Consistent Particle Size:
- Aim for uniform particle size to ensure even extraction. Inconsistent grinds can lead to uneven flavor in your cold brew.
- Measure Coffee Beans:
- Use a kitchen scale to measure the coffee beans accurately. The standard ratio is around 1:4 or 1:5 coffee to water, depending on your preferred strength.
- Grind Just Before Brewing:
- Grind the coffee beans just before starting the brewing process. Freshly ground beans preserve the flavors and aromas better than pre-ground coffee.
- Avoid Fine Grinds:
- Steer clear of fine grinds, as they can result in a cloudy and overly bitter cold brew. Stick to a coarse consistency to ensure a clean and balanced extraction.
- Experiment with Grind Size:
- Fine-tune the grind size based on your taste preferences. If your cold brew is too strong or weak, adjusting the grind size can make a significant difference.
- Consider a Slow Grind:
- If your grinder allows, opt for a slower grinding speed. This can minimize heat buildup during the grinding process, preserving the delicate flavors of the beans.
By following these guidelines and experimenting with grind size, you’ll be well-equipped to grind your coffee beans effectively for a delightful and refreshing cold brew experience.
Water-to-Coffee Ratio
Achieving the perfect water-to-coffee ratio is essential for crafting a well-balanced and flavorful cold brew. Striking the right balance ensures that your brew is neither too weak nor too strong.
Follow these guidelines to determine the ideal water-to-coffee ratio for your cold brew:
- Start with the Basics:
- A common starting point is a ratio of 1:4 or 1:5, meaning one part coffee to four or five parts water. This provides a good balance of strength and flavor.
- Adjust to Taste:
- Fine-tune the ratio based on your personal preferences. If you prefer a stronger brew, increase the amount of coffee grounds. For a milder taste, decrease the coffee-to-water ratio.
- Consider Brewing Concentrate:
- Some enthusiasts prefer brewing a concentrated cold brew and diluting it with water or milk when serving. This allows for flexibility in adjusting the strength to individual taste preferences.
- Experiment with Ratios:
- Feel free to experiment with different ratios to find the one that suits your taste best. Cold brew is forgiving, and slight adjustments can make a significant impact on the final flavor.
- Maintain Consistency:
- Consistency in measurement is key. Use a kitchen scale to accurately measure both the coffee grounds and water. This ensures reproducibility and helps you refine your preferred ratio over time.
- Account for Brewing Time:
- Keep in mind that the brewing time also affects the strength of your cold brew. Longer brewing times may result in a more concentrated flavor, so adjust the ratio accordingly.
- Scale Up or Down:
- Whether you’re making a small batch or preparing cold brew for a group, scale the ratio accordingly. Larger batches may require slightly more coffee grounds to maintain the desired strength.
- Document Your Preferences:
- Once you find the perfect ratio, document it for future reference. This makes it easier to replicate your preferred cold brew consistently.
By paying attention to the water-to-coffee ratio, you can customize your cold brew to suit your taste preferences, ensuring a refreshing and satisfying homemade beverage every time.
Brewing Time and Temperature
The brewing time and temperature are crucial elements in extracting the rich flavors and low acidity characteristic of cold brew coffee.
Follow these guidelines to achieve the perfect balance in your cold brew:
- Choose a Cold Brew Duration:
- Cold brew typically requires an extended steeping period. Aim for a brewing time between 12 to 24 hours. This slow extraction process brings out the smooth, nuanced flavors.
- Experiment with Brewing Time:
- Depending on your taste preferences, you can experiment with shorter or longer brewing times. Shorter times may result in a milder flavor, while longer times intensify the strength.
- Avoid High Temperatures:
- Cold brew gets its name from the process of brewing with cold or room temperature water. Avoid using hot water, as it can lead to over-extraction, bitterness, and a loss of the unique cold brew characteristics.
- Room Temperature or Refrigeration:
- You can brew at room temperature or in the refrigerator. Room temperature brewing is faster, while refrigerated brewing is more gradual and may produce a smoother flavor.
- Stir the Coffee Grounds:
- During the brewing process, gently stir the coffee grounds at the beginning to ensure even saturation. This promotes consistent extraction and enhances the overall flavor.
- Patience is Key:
- Allow the cold brew to steep patiently. The extended brewing time contributes to the smooth and less acidic profile. Plan ahead to ensure your cold brew is ready when you want to enjoy it.
- Strain Carefully:
- After the desired brewing time, strain the cold brew carefully to separate the liquid from the coffee grounds. This can be done using a fine mesh strainer, cheesecloth, or a specialized cold brew filter.
- Filter for Clarity:
- If you desire a clearer cold brew, consider using a secondary filtration method, such as a paper coffee filter, to remove any fine particles.
By understanding the importance of brewing time and temperature, you can master the art of cold brew coffee and create a beverage with a perfect balance of strength and smoothness. Experimenting with these variables allows you to tailor your cold brew to suit your unique taste preferences.
The Brewing Process Step by Step
Brewing your own delicious cold brew coffee at home is a rewarding process.
Follow these simple steps to master the art of crafting a refreshing cold brew:
Ingredients and Equipment:
- Coarsely ground coffee beans
- Filtered water
- Large jar or pitcher with lid
- Stirring utensil
- Fine mesh strainer or cheesecloth
- Sealable container or bottle
- Optional: ice cubes
Step 1: Gather Your Materials
- Ensure you have all the necessary ingredients and equipment ready.
Step 2: Measure Coffee Grounds
- Using a kitchen scale, measure the desired amount of coarsely ground coffee beans. A common starting point is 1 cup of coffee grounds for 4 cups of water.
Step 3: Add Coffee Grounds to Jar
- Place the measured coffee grounds into a large jar or pitcher.
Step 4: Add Filtered Water
- Pour filtered water over the coffee grounds in the jar. Use the desired water-to-coffee ratio (e.g., 4 cups of water for 1 cup of coffee grounds).
Step 5: Stir Gently
- Use a long spoon or stirring utensil to gently stir the coffee grounds and water, ensuring even saturation.
Step 6: Seal and Steep
- Seal the jar or pitcher with the lid and let it steep at room temperature or in the refrigerator for 12 to 24 hours, depending on your preferred strength.
Step 7: Strain the Cold Brew
- After the steeping period, use a fine mesh strainer or cheesecloth to separate the coffee liquid from the grounds. Strain the cold brew into another container.
Step 8: Optional Secondary Filtration
- For a clearer cold brew, consider using a secondary filtration method, such as a paper coffee filter.
Step 9: Transfer to Sealable Container
- Transfer the strained cold brew liquid to a sealable container or bottle for convenient storage.
Step 10: Serve and Enjoy
- To serve, pour the cold brew over ice if desired. You can also dilute it with water or milk based on your preference. Add sweeteners or flavors if you like.
Step 11: Store Remaining Cold Brew
- Seal the container and store any remaining cold brew in the refrigerator for up to two weeks.
By following these step-by-step instructions, you’ll be able to create a smooth and flavorful cold brew coffee right in the comfort of your own home. Experiment with the variables to find the perfect balance that suits your taste preferences.
Straining and Filtering Cold Brew
After the extended steeping period, the next crucial step is to separate the liquid coffee from the grounds. This process ensures a clean and smooth cold brew.
Follow these steps for effective straining and filtering:
Materials Needed:
- Brewed cold brew coffee
- Fine mesh strainer or cheesecloth
- Optional: Paper coffee filter, secondary filtration method
Step 1: Prepare Straining Setup
- Set up your straining equipment over a clean container or bowl. Place a fine mesh strainer or layer cheesecloth over the container.
Step 2: Initial Straining
- Carefully pour the brewed cold brew coffee through the fine mesh strainer or cheesecloth to catch the larger coffee grounds. Allow gravity to assist in the straining process.
Step 3: Press or Squeeze Gently (Optional)
- If using cheesecloth, you may gently press or squeeze the cloth to extract more liquid from the coffee grounds. Exercise caution to avoid cloudiness or excess sediment.
Step 4: Consider Secondary Filtration
- For a cleaner and more refined cold brew, consider a secondary filtration method. Place a paper coffee filter in the fine mesh strainer or use a specialized cold brew filter. Pour the cold brew through for a finer filtration.
Step 5: Patience During Filtration
- Allow the cold brew to pass through the filter naturally. This may take some time, but the result is a clearer and smoother beverage.
Step 6: Dispose of Coffee Grounds
- Discard the remaining coffee grounds. You can compost them or find alternative uses like in gardening.
Step 7: Sealable Container Transfer
- Once the cold brew has been effectively strained and filtered, transfer the liquid to a sealable container or bottle for storage.
Step 8: Optional Clarification
- For an even clearer cold brew, consider refrigerating the strained liquid for a few hours. This may result in sediment settling at the bottom, leaving a clearer beverage when poured.
Step 9: Seal and Refrigerate
- Seal the container and refrigerate the strained cold brew. It can be stored for up to two weeks.
Now that you’ve successfully strained and filtered your cold brew, you’re ready to enjoy a refreshing, homemade beverage. Experiment with serving over ice, diluting with water or milk, and adding any desired sweeteners or flavors to tailor it to your taste preferences.
Dilution and Serving Options
Once your cold brew coffee is ready, it’s time to explore various serving options to suit your taste preferences. Dilution plays a key role in achieving the perfect balance of strength and flavor.
Here’s how you can customize your cold brew:
1. Ice Cubes:
- Serve your cold brew over ice cubes for a refreshing and chilled experience. This is a classic and popular way to enjoy cold brew.
2. Dilute with Water:
- Adjust the strength of your cold brew by diluting it with cold water. This is particularly helpful if your initial brewing resulted in a more concentrated brew than desired.
3. Milk or Cream:
- Add a splash of milk or cream to create a creamy and smooth texture. Experiment with different types of milk, such as almond, soy, or oat milk, for a unique flavor profile.
4. Sweeteners:
- Customize the sweetness level by adding sugar, simple syrup, honey, or flavored syrups. Stir well to ensure the sweetener is evenly distributed.
5. Flavored Additions:
- Enhance your cold brew with flavored syrups, extracts, or spices. Common choices include vanilla, cinnamon, or a hint of chocolate for a personalized touch.
6. Coffee Ice Cubes (Optional):
- Freeze some of your cold brew into ice cubes. As these cubes melt, they won’t dilute your drink but will maintain and enhance the coffee flavor.
7. Citrus Twist:
- Garnish your cold brew with a citrus twist by adding a slice of orange, lemon, or a few drops of citrus zest. This adds a refreshing and aromatic element to your beverage.
8. Serve in a Specialty Glass:
- Elevate the presentation by serving your cold brew in a specialty glass or mason jar. Add a slice of lemon on the rim for a visually appealing touch.
9. Experiment with Ratios:
- Tailor the dilution and serving options to your personal taste. Experiment with different ratios of coffee, water, milk, and sweeteners until you find the perfect combination.
10. Enjoy It Black:
- Of course, you can always savor the pure and unadulterated flavor of cold brew by enjoying it black. This is an excellent way to appreciate the natural complexities of the coffee.
By exploring these dilution and serving options, you can transform your cold brew into a personalized and delightful beverage that suits your unique preferences. Whether you prefer it bold and black or with a splash of cream and sweetener, cold brew offers a versatile canvas for your creativity.
Storing Cold Brew Coffee
Proper storage is essential to maintain the freshness and flavor of your cold brew over time.
Follow these guidelines to store your homemade cold brew effectively:
1. Sealable Container:
- Transfer the strained and filtered cold brew into a sealable container or bottle. Airtight containers help preserve the flavors and prevent contamination.
2. Refrigerate Promptly:
- Place the sealed container in the refrigerator promptly after brewing. Cold brew is best stored in the fridge to slow down oxidation and maintain its quality.
3. Avoid Light Exposure:
- Store your cold brew in a dark or opaque container to minimize exposure to light. This helps preserve the coffee’s freshness and prevents any potential degradation from light exposure.
4. Store for Up to Two Weeks:
- Cold brew is at its peak freshness for the first two weeks after brewing. While it can be stored longer, the flavor may gradually diminish over time.
5. Cold Brew Concentrate:
- If you’ve brewed a concentrated cold brew, you can extend its shelf life by diluting it with water or milk when serving. This allows you to enjoy the flavor over a more extended period.
6. Use a Glass Container:
- Opt for a glass container instead of plastic to store your cold brew. Glass is less permeable and less likely to absorb odors or affect the coffee’s taste.
7. Keep Away from Strong Odors:
- Cold brew coffee can absorb odors from its surroundings. Store it away from strong-smelling foods or substances in the refrigerator to maintain its pure flavor.
8. Avoid Freezing:
- While freezing is an option, it may alter the flavor and texture of your cold brew. It’s generally recommended to avoid freezing unless you’re making coffee ice cubes for future use.
9. Shake Before Serving:
- Before serving, give the container a gentle shake to mix any settled sediments and ensure an even distribution of flavors.
10. Small Batch Brewing:
- Consider making smaller batches of cold brew more frequently rather than preparing a large batch that may lose its freshness over time.
By following these storage guidelines, you can ensure that your cold brew coffee remains fresh, flavorful, and ready to be enjoyed whenever you crave a refreshing sip.
Adding Sweeteners or Flavors (Optional)
Enhancing your cold brew with sweeteners or additional flavors can elevate your coffee-drinking experience.
Here are some optional steps to experiment with and customize the taste of your cold brew:
1. Sweeteners:
- Choose from a variety of sweeteners such as sugar, simple syrup, honey, agave nectar, or even flavored syrups. Start with a small amount, and adjust to your preferred level of sweetness.
2. Vanilla Extract:
- Add a few drops of pure vanilla extract to impart a subtle and sweet vanilla flavor to your cold brew.
3. Cinnamon or Nutmeg:
- For a warm and aromatic twist, sprinkle a pinch of ground cinnamon or nutmeg into your cold brew. Stir well to incorporate the flavors.
4. Chocolate Syrup:
- Introduce a touch of sweetness and chocolatey goodness by drizzling some chocolate syrup into your cold brew. Stir thoroughly for an indulgent treat.
5. Flavored Creamers:
- Experiment with flavored creamers like vanilla, hazelnut, or caramel to add richness and a hint of flavor to your cold brew.
6. Mint Leaves:
- Infuse a refreshing minty flavor by adding fresh mint leaves to your cold brew. Allow the leaves to steep for a short time before straining.
7. Citrus Zest:
- Enhance the brightness of your cold brew by adding a twist of citrus zest. Lemon or orange zest can add a zesty and aromatic element to the coffee.
8. Lavender or Other Herbs:
- For a unique twist, consider adding a touch of culinary lavender or other herbs like rosemary. Be cautious with the quantity to avoid overpowering the coffee.
9. Almond or Coconut Milk:
- Replace regular milk with almond or coconut milk for a nutty and creamy flavor. This also caters to those with dietary preferences or restrictions.
10. Cold Brew Float:
- Take your cold brew to the next level by adding a scoop of your favorite ice cream or gelato. This creates a delightful cold brew float with a creamy and sweet kick.
11. Irish Cream or Liqueurs (Adult Option):
- For an adult twist, consider adding a splash of Irish cream or your favorite liqueur to your cold brew. This adds complexity and a hint of alcohol to the beverage.
12. Experiment and Adjust:
- The beauty of cold brew is its versatility. Feel free to experiment with various combinations of sweeteners and flavors, and adjust according to your taste preferences.
Adding sweeteners or flavors is entirely optional and depends on your personal preferences. These variations allow you to tailor your cold brew to create a unique and enjoyable coffee experience.
Tips for a Perfect Cold Brew
Achieving the perfect cold brew requires attention to detail and experimentation.
Here are some tips to help you master the art of making a refreshing and flavorful cold brew:
1. Start with Quality Coffee Beans:
- Use high-quality, freshly roasted coffee beans. Opt for a medium to dark roast for a richer flavor profile.
2. Coarse Grind Size is Key:
- Grind your coffee beans to a coarse consistency to prevent over-extraction and bitterness. A burr grinder is ideal for achieving a uniform grind.
3. Measure Accurately:
- Use a kitchen scale to measure both the coffee grounds and water accurately. Consistency in measurement is crucial for reproducibility.
4. Experiment with Ratios:
- Explore different water-to-coffee ratios to find the strength that suits your taste preferences. Common ratios range from 1:4 to 1:5.
5. Patience is a Virtue:
- Allow the cold brew to steep for an extended period, typically between 12 to 24 hours. Longer steeping times can result in a more concentrated and flavorful brew.
6. Stir During Brewing:
- Stir the coffee grounds and water mixture gently at the beginning of the brewing process to ensure even saturation.
7. Strain Carefully:
- When straining, use a fine mesh strainer or cheesecloth to remove the coffee grounds. For a cleaner brew, consider a secondary filtration method with a paper coffee filter.
8. Cold Brew Concentrate:
- Brew a concentrated cold brew if you prefer flexibility in diluting the strength when serving. This concentrate can be stored and diluted as needed.
9. Experiment with Brewing Time:
- Adjust the brewing time to your taste preferences. Shorter times may result in a milder flavor, while longer times intensify the strength.
10. Use Cold or Room Temperature Water:
- Brew with cold or room temperature water to maintain the smooth and low-acid characteristics of cold brew. Avoid hot water, as it can lead to over-extraction.
11. Store Properly:
- Transfer the strained cold brew to a sealable container and refrigerate promptly. Use a glass container to prevent absorption of odors.
12. Dilute and Customize:
- Experiment with serving options by diluting with water, adding ice, milk, sweeteners, or flavors. Tailor your cold brew to suit your taste preferences.
13. Clean Equipment Thoroughly:
- Ensure all equipment, including jars, strainers, and utensils, is clean to prevent any off-flavors or contamination.
14. Refreshing Ice Cubes:
- Use cold brew ice cubes to prevent dilution as they melt. Freeze some of your cold brew in an ice cube tray for this purpose.
15. Enjoy Freshness Within Two Weeks:
- Cold brew is at its best within the first two weeks. While it can be stored longer, the flavor may gradually diminish over time.
By incorporating these tips into your cold brew-making routine, you’ll be on your way to creating a consistently delicious and refreshing homemade cold brew coffee.
Common Mistakes to Avoid
While making cold brew is a relatively straightforward process, there are some common mistakes that can impact the flavor and quality of your final brew.
Here are some pitfalls to avoid:
1. Using Poor-Quality Coffee Beans:
- Starting with low-quality or stale coffee beans can significantly impact the flavor of your cold brew. Choose fresh, high-quality beans for the best results.
2. Grinding Too Fine:
- Grinding coffee beans too finely can lead to over-extraction and a bitter taste. Aim for a coarse grind to achieve a smoother and less acidic cold brew.
3. Inconsistent Grind Size:
- Inconsistencies in grind size can result in uneven extraction. Ensure that your coffee grounds have a uniform coarseness to achieve a balanced flavor.
4. Incorrect Water-to-Coffee Ratio:
- Failing to measure the water-to-coffee ratio accurately can result in a brew that is too strong or too weak. Use a kitchen scale for precision.
5. Short Steeping Time:
- Cold brew requires an extended steeping period for optimal extraction. Steeping for too short a time may result in a underdeveloped flavor. Aim for at least 12 hours.
6. Using Hot Water:
- Cold brew gets its name from brewing with cold or room temperature water. Using hot water can lead to over-extraction and a different flavor profile.
7. Neglecting Stirring During Brewing:
- Failing to stir the coffee grounds during the brewing process can result in uneven saturation. Stir gently at the beginning to ensure proper extraction.
8. Rushing the Straining Process:
- Straining the cold brew too quickly or not allowing sufficient time for filtration can result in a cloudy brew with sediment. Take your time to strain carefully.
9. Storing Without Sealing:
- Failing to transfer the cold brew to a sealable container can lead to flavor degradation and absorption of odors from the refrigerator.
10. Storing for Too Long: – While cold brew can be stored for an extended period, its peak freshness is within the first two weeks. Extended storage may lead to a decline in flavor.
11. Skipping the Dilution Step:
- Forgetting to dilute your concentrated cold brew when serving can result in an overly strong and intense flavor. Dilute according to your taste preferences.
12. Overlooking Cleanliness:
- Neglecting to clean your brewing equipment thoroughly can introduce off-flavors or contamination. Ensure all tools are clean before each use.
13. Not Experimenting with Serving Options:
- Cold brew is versatile, and not experimenting with dilution, ice, milk, or flavor options may limit your enjoyment. Be open to trying different combinations.
14. Freezing Cold Brew:
- Freezing cold brew can alter its flavor and texture. Avoid freezing unless you’re making coffee ice cubes for future use.
By avoiding these common mistakes, you can enhance the quality and consistency of your homemade cold brew coffee, ensuring a delightful and refreshing experience with every sip.
Frequently Asked Questions (FAQs)
Q1: What is cold brew coffee?
- A1: Cold brew coffee is a brewing method where coffee grounds are steeped in cold or room temperature water for an extended period, typically 12 to 24 hours. The result is a smooth, less acidic, and concentrated coffee that is often served over ice.
Q2: How is cold brew different from iced coffee?
- A2: Cold brew is made by steeping coarsely ground coffee in cold water, while iced coffee is brewed hot and then chilled. Cold brew is known for its smoother and less acidic taste compared to iced coffee.
Q3: What type of coffee beans are best for cold brew?
- A3: Medium to dark roast coffee beans are commonly preferred for cold brew. Choose high-quality, freshly roasted beans for the best flavor.
Q4: What is the ideal water-to-coffee ratio for cold brew?
- A4: The water-to-coffee ratio typically ranges from 1:4 to 1:5, depending on personal preference. Experiment with ratios to find the strength you enjoy.
Q5: How long should I steep cold brew coffee?
- A5: Cold brew coffee is usually steeped for 12 to 24 hours. Longer steeping times can result in a more concentrated flavor.
Q6: Can I use hot water to make cold brew faster?
- A6: It’s not recommended. Using hot water can lead to over-extraction and a different flavor profile. Cold brew is intended to be brewed with cold or room temperature water.
Q7: How should I store leftover cold brew?
- A7: Transfer the strained cold brew to a sealable container and refrigerate promptly. Use a glass container to prevent absorption of odors.
Q8: Can I dilute cold brew with milk or water?
- A8: Yes, you can dilute cold brew with water, milk, or a milk alternative based on your preference. Adjust the dilution to achieve your desired strength.
Q9: Can I heat up cold brew coffee?
- A9: While cold brew is traditionally served cold, you can heat it if you prefer a warm beverage. Keep in mind that heating may alter the flavor profile.
Q10: How long does cold brew coffee last?
- A10: Cold brew is best enjoyed within the first two weeks after brewing. While it can be stored longer, the flavor may gradually diminish over time.
Q11: Can I make cold brew without a special cold brew coffee maker?
- A11: Absolutely! You can make cold brew using a jar or pitcher, coffee filters, and a fine mesh strainer. Specialized equipment is not essential but can make the process more convenient.
Q12: Is cold brew more caffeinated than regular coffee?
- A12: Cold brew can be more concentrated, but the caffeine content depends on the brewing ratio and dilution. It’s often served over ice or diluted, so the caffeine level may not be significantly higher than regular coffee.
These FAQs cover some common queries about cold brew coffee, providing insights into the brewing process, storage, and customization options.
Conclusion and Enjoying Your Homemade Cold Brew Coffee
Making cold brew at home is a rewarding experience that allows you to enjoy a personalized coffee beverage tailored to your taste. Whether you prefer it classic and black or adorned with various additions, your homemade cold brew is a testament to your brewing skills. Cheers to the perfect cup of cold brew and the delightful moments it brings!
Cold Brew Coffee
Equipment
- 1 Large jar or pitcher with lid
- 1 Stirring utensil
- 1 Fine mesh strainer or cheesecloth
- 1 Sealable container or bottle
Ingredients
- 1 cup coarsely ground coffee beans
- 4 cups filtered water
Instructions
Prepare Coffee Grounds
- Measure 1 cup of coarsely ground coffee beans.
Combine Coffee and Water
- In a large jar or pitcher, add the coarsely ground coffee beans. Pour 4 cups of filtered water over the coffee grounds.
Stir Gently
- Use a long spoon or stirring utensil to gently stir the coffee grounds and water, ensuring even saturation.
Seal and Steep
- Seal the jar or pitcher with the lid and let it steep at room temperature or in the refrigerator for 12 to 24 hours, depending on your preferred strength.
Strain the Cold Brew
- After the steeping period, use a fine mesh strainer or cheesecloth to separate the coffee liquid from the grounds. Strain the cold brew into another container.
Transfer to Sealable Container
- Transfer the strained cold brew liquid to a sealable container or bottle for convenient storage.
Serve and Enjoy
- To serve, pour the cold brew over ice if desired. Customize with water, milk, or sweeteners based on your preference.
Store Remaining Cold Brew
- Seal the container and store any remaining cold brew in the refrigerator for up to two weeks.
Notes
- Experiment with the water-to-coffee ratio to adjust the strength of your cold brew.
- Customize your serving with ice, milk, or sweeteners to suit your taste preferences.
- Cold brew concentrate can be diluted with water or milk when serving for a milder taste.